Q&A


Though we endeavour to be as clear as possible, there may be questions you have regarding a particular service. We have compiled a helpful list of 'most received' questions, so let's share some knowledge.

We will continue to add to this Q&A section as we receive queries on products & services.

Can't find the answer you're looking for?
Feel free to ...

So, if I order?

What happens and when.


Imagine Online vs Graded Services

C-Type Services

Imagine Digital Printing

To remain competitive with non-professional labs, we now offer a selection of services through our online ordering system called ‘Imagine’. This is a fully automated ‘DIY’ service where you upload your files, select a print size, crop as necessary and pay. You can choose to collect in lab or have your order delivered to you.

This service is ideal for those who might struggle to resize or crop their images. It is also useful for customers who have colour managed and resized their files.

This services does not include any file alteration, we simply print exactly what you submit. Therefore it is imperative that you check your order before submitting as customer errors which result in an incorrect print will still be chargeable.

We will assume that any images you submit are in a ‘print ready’ state.

Graded Digital Printing

This is our professional lab standard practice. We will crop, resize, colour correct and optimise your image files to produce the best results. We will also contact you if there is a discrepancy between the file you send and the size you wish to print.

Is there a difference in quality?

There is no difference in the quality of the prints between the two services. We use the same paper, chemistry and printers. The only difference is our level of involvement with your files. 

*Not all services and sizes are available to order through our Imagine online system.


Giclee Services

Simply Giclee
As above for the Imagine service with the addition of images being printed onto 180gsm high resolution medium weight paper.

Fine Art Giclee
As above for the graded service with the addition of images being printed onto a selection of fine art guild approved giclee media. This is archival for approximately 70 years under optimal conditions.

Fine art giclee paper options include Fujifilm Fine Art Photo Rag 300gsm, Fujifilm Pearl 290gsm and Hahnemuhle Photo Rag Baryta 325gsm and more. All our fine art media is Fine Art Guild assured and meets the criteria required as defined by their recognised standard.

What's the deal with RAW?

Digital Negatives

RAW files and how we treat them.

DNG, CR2, NEF… there seems to be no end to brand specific raw file extensions. Even newer cameras from the same brand can be incompatible with older software, working with RAW can be a real headache. Although RAW is a complicated animal, it is one which must be tamed. The benefits of shooting RAW, white balance, tonal range, exposure latitude, lens correction and so on all offer a vastly increased level of control compared with jpg files.

To make the most of your RAW files it is best to work with a colour calibrated screen. If you have yet to do this, consider a Spyder or similar tool for screen calibration.

Working with RAW files provides you with complete control to either reproduce exactly the situation, lighting and colour of the shoot or to realise your unique vision for the image.

RAW files? No thank you.

If RAW files are so much better, why don’t we accept them? The simple answer is that we can’t interpret your RAW files for you. Shooting in RAW enables you to recreate the scene you photographed. Therefore you are in the best position to edit and tweak your RAW files to achieve an accurate result.

If not then what?

To retain the lossless nature of your RAW files, we recommend that you export your images as uncompressed tif files. Alternatively, if you have a large volume of images to send or you wish to order prints smaller than 18×12 inches, exporting to 90% jpg files will still produce very high quality prints.

In most cases, correctly exported tif and jpg images will produce near identical results at sizes below 18×12 inches. It is worthwhile considering jpgs for large online orders where the file size of tifs may be taking too long to upload.

Delivery

When and How?

Postage, packing, mail orders and ETA.

The standard time in lab is usually no longer than 3 working days from receiving your order. Mounting, Canvas Prints, and some other services will take longer than this. If you need an exact time, please Contact Us. Unless otherwise stated or offered, our standard postal service is Royal Mail 2nd class.


Film Services

If you are ordering online through our Analogue Shop or sending a mail order, we can ship back to your address or you can pick up from the counter.

Other Services

Our standard postal service on all other products is Royal Mail 2nd class . Options include ‘next working day’ sent by courier. For more information, an exact cost or international postage estimations, please Contact Us

payment cards credit debit visa electron solo Please note that all postage costs featured on this website are based specifically on posting to mainland UK addresses.

Mail Orders

Snail Mail

Yes we accept orders from around the globe.

If you would like to post a film or CD to us please use the following address:

CC Imaging
Unit 7 Scala Court
Leathley Road
Leeds
LS10 1JD

Remember to download and complete a job sheet outlining your order and services required. Include this job sheet when sending in your film or CD.

Payment can be made over the phone via credit/debit card, so please also provide your telephone number. Alternatively, you can include payment as a cheque for the total amount made payable to ‘CC Imaging Photo Lab Ltd’. Print orders placed via CD will be subject to our Graded service pricing. 

Online Services

Remember that you can order film services through our Analogue Shop. Simply add the services your require to your basket and pay via PayPal, credit/debit card.

As an alternative to posting a CD/DVD, you could simply upload and order prints, canvas wraps and more through our Online Ordering Service.

What if My Film is Blank?

We Are Transparent

It’s never a cause for celebration, but we are here to help.

In the event that your film is blank we will inform you and refund you the difference from your order after deducting the cost of processing. We know how deflating it can be to find out a roll featuring holiday photographs is blank, so this is the least we can do to soften the loss.

Can I have an example?

If you order a 35mm Process, Scan & Print package deal from our Analogue Shop (C41 chemistry) and you also add digital transfer, the package price is £15.00. In the event of your film being blank, we would refund you the difference after deducting the cost of processing (£6.50). The total refund for this order would be £8.50.

I’d Like Some Help

Just what are the differences?


What is C-Type?

An Old Familiar Friend

Light sensitive paper developed through chemistry.

ledC-Type? What’s a C-Type print? Don’t worry if you’re not familiar with the term. C-Type prints are what most people would consider a traditional photograph. Glossy or Lustre photographic paper, which has been used for generations. C-Type prints can also be referred to as ‘lightjet’, ’emulsion’ or ‘lambda’ prints. Here at CC Imaging we produce C-Type prints using digital printers or traditional enlargers.

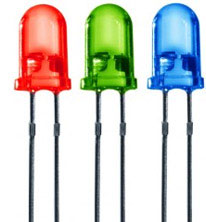
C-Type Digital Printing
This type of digital printing is produced by exposing light sensitive paper with a print head which uses red, green and blue LEDs. Much like an inkjet printer, the LED head moves across the surface of the light sensitive paper and exposes part of the image with every pass. After fully exposing the image, the light sensitive paper is then passed through our RA-4 chemical processor.

Minilab
Print sizes from 5×3.5 inch up to 18×12 inch are produced on our industry standard Fujifilm Frontier 570 minilab. Perfect sizes for our Economy Digital Prints service.

Durst Epsilon 
Larger sized prints are produced on our 30 inch wide, roll fed Durst Epsilon. This large format C-Type printer is ideal for poster and banner prints which feature the same look and feel as regular photographic prints. For more information on larger sized prints, please refer to our Poster Prints page. 

Print Ratios & Options

Formatting that Fits

Do you want to crop or retain full image area?

There are literately hundreds of different cameras available today. If you use 35mm camera or a digital SLR, chances are that your images will have a 3:2 ratio. 3:2 is considered to be the standard photographic ratio upon which most of our print sizes are based. So what happens if you want a print that is a different ratio (shape) to your original image? Speeding to the rescue comes ‘Fill In’ and ‘Fit In’. 

fit or fill digital printing

Below is an explanation of these 2 options, so you can decide which is preferable when ordering your prints.

Original

Imagine that the image below represents the standard shape of a picture (that is to say the ratio) taken with your camera. This image has a ratio of 3:2 and will print exactly as you see it below at the standard sizes of 6×4 inches, 9×6 inches and 12×8 inches. Nothing is enlarged, lost or cropped.

3:2 ratio digital print

This image & print has a ratio of 3:2

Fit In

Using our original image (above, which has a 3:2 ratio) we have decided to print this out at a size of 10×8 inches. The image below represents how the ‘Fit In’ option affects our original image.

fit in digital printThis image has a ratio of 3:2, resulting in borders top and bottom when set to
‘Fit In’ on a 10×8 print

Notice that the whole of the image fits onto the 10×8 inch sheet of paper, but with borders at the top and bottom. This is because the 10×8 inch paper is a different shape to our original image (a different ratio), so the only way to avoid losing any of the image is to ‘Fit’ the image to the maximum width and have white borders on the top and bottom.

Fill In

Again using our original image (which has a 3:2 ratio), we have decided that we don’t want borders at the top and bottom of our 10×8 inch print. The image below represents how the ‘Fill In’ option affects our original image.

digital print fill in option

This image has a ratio of 3:2 resulting in cropping when set to ‘Fill In’ on a 10×8 print

See how our original image has been enlarged so that there are no white borders on top or bottom. Enlarging the image means that two bridesmaids have each lost an elbow. This is because the 10×8 inch paper is a different shape to our original image (a different ratio), so the only way to cover the whole sheet of paper is to ‘Fill’ the image, which leads to cropping.

Digital Imaging

Please explain scans in detail.


Understanding Resolution

The Binary Domain

It sounds like a lot of ones and zeros to me.

In a nutshell, resolution is the number of pixels contained within a digital image. Resolution is not the number these pixels are divided by (some believe resolution means PPI/DPI).

When something is scanned, or a photograph is taken on a digital camera, the resulting image is made from a group of pixels; think of this image as a mosaic. Each individual pixel has a colour. This group of pixels, like the mosaic when viewed further back, produce a recognisable image.

The quality of a scan is not measured by the DPI/PPI of the file, it can only be measured by how many pixels the scan contains. Better quality scanners give the user options to scan at a variety of pixel densities (scans with more or less pixels).


We can illustrate this with a photographic example:

Imagine you wish to photograph a landscape. You set up your camera, zoom out to fit as much in as possible and then take your photograph. Lets say this represents a low resolutions scan.

Now imagine that instead of zooming out, you zoom in and then take dozens of photographs covering the same total area. If we stitch all these images together, you have what represents a high resolution scan. Each small area of the stitched image is equal to the ‘full area’ of the wide angle image.

It goes without saying that we would be able to produce a much larger print from the stitched image.

Do you scan at 300dpi?

300

OK, it’s not quite Sparta… but close.

In a word, no. We don’t scan at 300dpi/ppi.

  • Q:  So why do we supply scans to you at a resolution of 300dpi/ppi? 
  • A:  Simply because the vast majority of our print processes uses a resolution of 300dpi/ppi. This is due to the 300ppi golden rule. The theory is that when looking at an image that has been divided by a figure of 300ppi (pixels per inch) from a distance of about 12 inches, the average human eye cannot distinguish the individual pixels that make up the image. This makes the 300ppi golden rule a useful guide for calculating the print size of a digital image.

Frontier scans are produced to set photographic dimensions (6×4 inch, 9×6 inch…etc..). These are scanned not with a dpi/ppi in mind, rather specific pixel widths and pixel heights. A 6×4 inch scan is made up of a grid of pixels; 1800 pixels along one side and 1200 pixels along the other side (equal to a 2.2 megapixel file).

We could divide the longest side (1800 pixels) by any number really. By dividing the pixels we are not adding or subtracting pixels, we are just changing how many pixels fit into a unit of 1 block (or 1 inch when talking about printing). Lets look at this another way:

12 ÷ 3 = 4        or        12 ÷ 2 = 6       or      12 ÷ 1 = 12

Here, the number 12 represents the pixels in our longest side (1800 pixels). The second number in the equation represents our dpi/ppi. The quotient (result) represents how many inches long the resulting print will be.

What is 'Digital Transfer'

Sent in a flash

Not in a jiffy (bag)

If you select the option for ‘Digital Transfer’ as part of your order on our Analogue Shop, this simply means that after scanning your film we will send the scans to you via WeTransfer. This is particularly useful for those with tight deadlines or as risk mitigation (let’s be honest, things do go missing in the post). A quid provides a no nonsense security net should your film veer off the beaten track once posted back to you.

21st Century Photo Lab

Now you can place orders 24/7.


Uploading Files

Bigger is Better

For professional quality prints, go large!

When uploading images you will be given a choice between Small, Medium or Large. We recommend all users to choose the Large option regardless of the size you wish to print your files.

large_uploadPlease choose ‘Large Image Upload’

Currently we are unable to remove the Small and Medium options, so please remember this when uploading your files. 

Organising Files

Keeping Tidy

Manage files & organise albums.

When uploading files you are asked if you would like to create a new album (an album behaves like a folder) or use an existing album.

  • Q: What if I upload files to the wrong album or want to rename an existing album?
  • A: Have no fear, ‘My Photos’ is here! The My Photos button is located along the top of the screen and looks like this…

my photos buttonThe ‘My Photos’ button located across the top of our online ordering system.

After clicking this button you will be taken to the photo manager where you can organise, delete, add or rename albums. If you need to move image files from one album to another, you can simply drag an image and drop it onto the correct album in the far left column. You will also be asked to confirm the move to prevent you moving files by accident. Multiple image files can be selected and then dragged to a different album to save time.

You can rename or delete an album by selecting it in the column on the far left and then clicking either the pen (rename) or bin (delete) icon. Please note that deleting an album will also delete all the images that it holds.

Postage & ETA

When, Where & How

Options to suit be you near or far.

In most cases, Digital Prints will be ready within two working days of placing your order.

  • Q: I ordered some prints and a photo gift but it says 14 days?
  • A: Photo gifts may take around 14 days to arrive (or be ready for collection). However, your digital prints will be ready for collection or dispatched separately, approximately two working days from placing your order.
USEFUL INFORMATION
DOWNLOAD COLOUR PROFILES
Profile Used For
   
CC Standard C-Type up to 18×12″
Epsilon Matte C-Type over 18×12″
Epsilon Gloss C-Type over 18×12″
   
Adobe1998 Giclee Printing
   

The Adobe RGB profile should already be installed on your system

PRINTABLE JOB SHEETS
File Post / Collect Orders
   
Job Sheet Editable Word doc
Job Sheet Write by hand
   
Fuji Style Order Form PDF to print
Fuji Style Price List PDF to print
 

Please include one of the above when sending an order through the post or dropping off for collection. Thank you.

School of CC

Need help with resizing, cropping or colour? See Me!

Our School of CC provides a wide variety of guides to help you take control of your images. If you are new to image editing or would like to take a look at our 'best practice' recommendations, check out a lesson or two for yourself.

What was once exclusive to commercial photographers is now available to everyone.

--->