Fit or Fill: That is the Question!
January 20th, 2019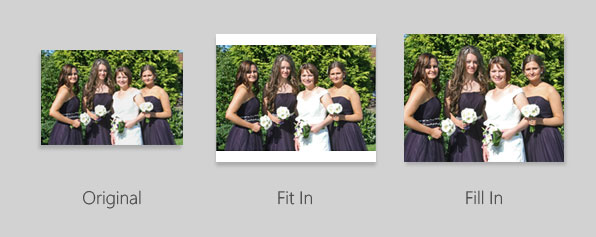
So you have an image and you want to make a print of it. The only problem is, the image is a landscape but you want a square print to match your other framed prints hanging in the dining room. What is the solution? We have 2 options which control how your image will be printed.
Formatting that Fits
Do you want to crop or retain full image area?
There are literately hundreds of different cameras available today. If you use 35mm camera or a digital SLR, chances are that your images will have a 3:2 ratio. 3:2 is considered to be the standard photographic ratio upon which most of our print sizes are based. So what happens if you want a print that is a different ratio (shape) to your original image? Speeding to the rescue comes ‘Fill In’ and ‘Fit In’.

Below is an explanation of these 2 options, so you can decide which is preferable when ordering your prints.
Original
Imagine that the image below represents the standard shape of a picture (that is to say the ratio) taken with your camera. This image has a ratio of 3:2 and will print exactly as you see it below at the standard sizes of 6×4 inches, 9×6 inches and 12×8 inches. Nothing is enlarged, lost or cropped.

This image & print has a ratio of 3:2
Fit In
Using our original image (above, which has a 3:2 ratio) we have decided to print this out at a size of 10×8 inches. The image below represents how the ‘Fit In’ option affects our original image.
 This image has a ratio of 3:2, resulting in borders top and bottom when set to
‘Fit In’ on a 10×8 print
Notice that the whole of the image fits onto the 10×8 inch sheet of paper, but with borders at the top and bottom. This is because the 10×8 inch paper is a different shape to our original image (a different ratio), so the only way to avoid losing any of the image is to ‘Fit’ the image to the maximum width and have white borders on the top and bottom.
Fill In
Again using our original image (which has a 3:2 ratio), we have decided that we don’t want borders at the top and bottom of our 10×8 inch print. The image below represents how the ‘Fill In’ option affects our original image.

This image has a ratio of 3:2 resulting in cropping when set to ‘Fill In’ on a 10×8 print
See how our original image has been enlarged so that there are no white borders on top or bottom. Enlarging the image means that two bridesmaids have each lost an elbow. This is because the 10×8 inch paper is a different shape to our original image (a different ratio), so the only way to cover the whole sheet of paper is to ‘Fill’ the image, which leads to cropping.